Migrating a classic Jekyll GitHub Pages site to GitHub actions
15 May 2023I’ve had this site (https://anthonybruno.dev/) running inside Github Pages for a long time now without many issues. Under the hood, it uses a ruby-based static site generator called Jekyll.
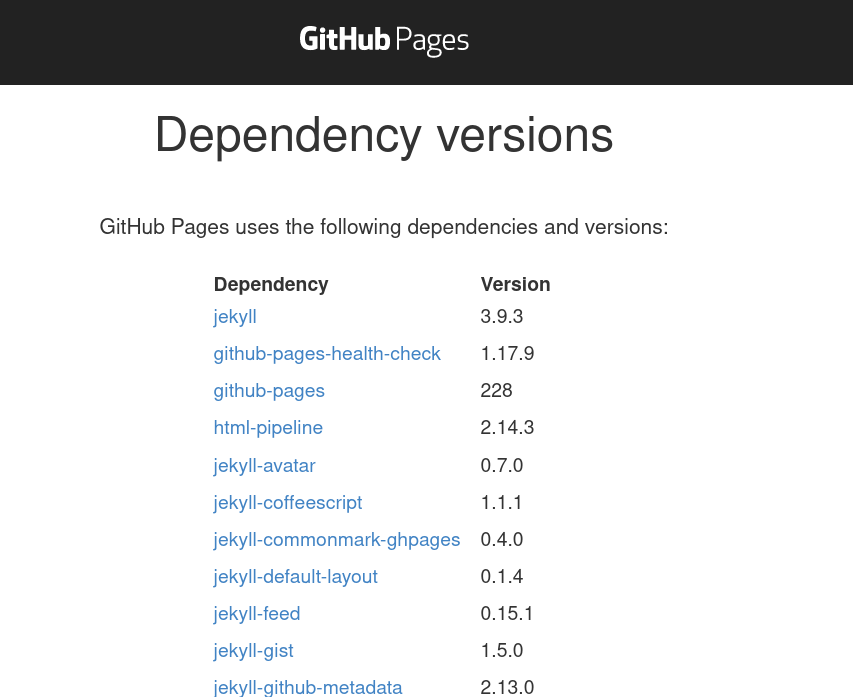
However, something that I have noticed is that you don’t have much control over what Jekyll and ruby version is used. This seems to be getting a little bit out of date as time goes on. GitHub lists the dependencies on this page. At time of writing, it uses Jekyll 3.9.3 (latest version is 4.3.2), and ruby 2.7.4 (latest version is 3.2.2).
Additionally, GitHub restricts what Jekyll plugins you can use and actually
enables certain plugins that can’t be disabled. For instance, it brings in jekyll-coffeescript…
which is used to convert coffeescript…even though my site doesn’t have any coffeescript (it’s 2023!).

For these reasons, I looked into alternatives, and I found out that you can use GitHub actions to deploy a site!
I couldn’t find a nice guide on how to do this, so after working things out, I decided to write this guide.
It’s pretty straightforward, we only really need to do 2 things:
- Adjust the repository settings to use GitHub actions for site deployments.
- Add a single YAML file to define how GitHub will build and deploy the site.
Steps
1. Repository Settings
Firstly, we need toggle the deployment setting from the ‘default’ GitHub pages deploy to GitHub actions.
We can do this via Settings -> Pages. We just need to change the ‘Source’ as shown in the screenshot below:
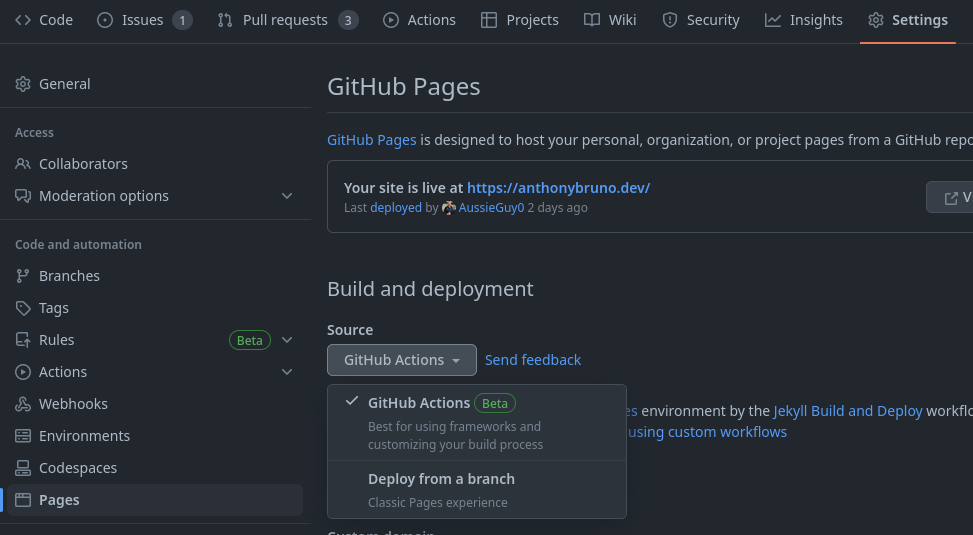
Note that this won’t really do anything, until we do the next step!
2. GitHub Actions Workflow
The workflow is how we tell GitHub how to build and deploy the site. You can read a bit more about workflows in the GitHub docs (there’s a bunch more cool things you can do with workflows!)
To start, we need to define a YAML file in the path <repo-root>/.github/workflows/<workflow-name>.yml
We can call the workflow file anything. I just went with the very creative name: jekyll.yml.
The contents of the file should look something like the below. For those interested, I will explain it further down below.
name: Jekyll Build and Deploy

on: [push]

jobs:

  build:
    runs-on: ubuntu-latest
    steps:
      - uses: actions/checkout@v3
      - uses: ruby/setup-ruby@v1
        with:
          ruby-version: '2.7.4'
          bundler-cache: true # runs 'bundle install' and caches installed gems automatically
      - run: bundle exec jekyll build
      - uses: actions/upload-pages-artifact@v1
        with:
          path: "_site/"

  deploy:
    # Add a dependency to the build job
    needs: build
    if: github.ref == 'refs/heads/master' # Only deploys on master

    # Grant GITHUB_TOKEN the permissions required to make a Pages deployment
    permissions:
      pages: write      # to deploy to Pages
      id-token: write   # to verify the deployment originates from an appropriate source

    # Deploy to the github-pages environment
    environment:
      name: github-pages
      url: ${{ steps.deployment.outputs.page_url }}

    # Specify runner + deployment step
    runs-on: ubuntu-latest
    steps:
      - name: Deploy to GitHub Pages
        id: deployment
        uses: actions/deploy-pages@v2
Side-note: this requires a Gemfile to be defined in the repository root. I’m not sure if my one
was created when I first set up the GitHub pages (many years ago!), or I added it afterwards. In
case you don’t have one, here’s mine:
source 'https://rubygems.org'
gem 'github-pages', group: :jekyll_plugins
gem 'jekyll-seo-tag'
gem 'rouge'
gem 'jekyll-feed'
Explaining the workflow
I’ll break it down section by section:
name: Jekyll Build and Deploy
The name of the workflow, which is shown in GitHub’s UI.
on: [push]
Indicates that the workflow will run on any push to the GitHub repository. This includes commits in PRs.
  build:
    runs-on: ubuntu-latest
    steps:
      - uses: actions/checkout@v3
      - uses: ruby/setup-ruby@v1
        with:
          ruby-version: '2.7.4'
          bundler-cache: true # runs 'bundle install' and caches installed gems automatically
      - run: bundle exec jekyll build
      - uses: actions/upload-pages-artifact@v1
        with:
          path: "_site/"
The build job will:
- Check out the repository (
actions/checkout@v3) - Set up ruby with the specified version. This step will also run
bundle installfor us! (ruby/setup-ruby@v1) - Run
bundle exec jekyll build. This runs Jekyll and produces the generated site in the folder_site/. - Finally, uploads the generated site using
actions/upload-page-artifacts@1, which is a requirement to deploy the site.
  deploy:
    # Add a dependency to the build job
    needs: build
    if: github.ref == 'refs/heads/master' # Only deploys on master

    # Grant GITHUB_TOKEN the permissions required to make a Pages deployment
    permissions:
      pages: write      # to deploy to Pages
      id-token: write   # to verify the deployment originates from an appropriate source

    # Deploy to the github-pages environment
    environment:
      name: github-pages
      url: ${{ steps.deployment.outputs.page_url }}

    # Specify runner + deployment step
    runs-on: ubuntu-latest
    steps:
      - name: Deploy to GitHub Pages
        id: deployment
        uses: actions/deploy-pages@v2
It’s important to note that the deploy job:
- Only runs after the build job is done.
- Will only run on
master, which is my repository’s default branch. Newer repositories will havemainas their default branch. - Has suitable permissions to deploy to GitHub Pages.
The only step that this job has is: actions/deploy-pages@v2. This deploys the site that we
uploaded in the build step with actions/upload-pages-artifact@v1.
3. Success!
When you next push to your default branch, you should see the workflow running in the actions page of your repository.
Here is an example of mine:
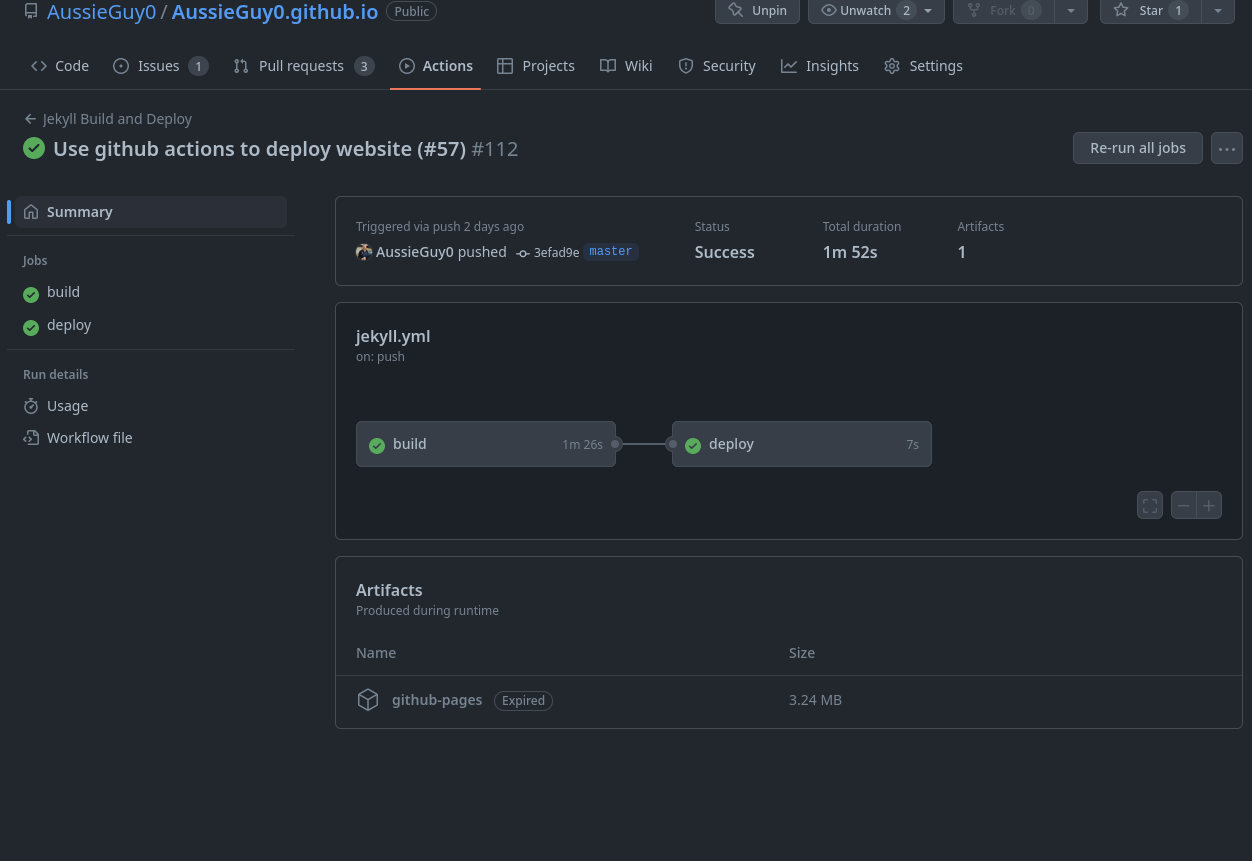
And the fact that you can read this page, means that the workflow is deploying the site. Yay!
Now, you can run any version of ruby and Jekyll you want, use any plugin you want, and I can finally get rid of that weird coffeescript plugin. Double yay!
For reference, please take a look at my PR, which converted this site to use Github Actions.